 |
|||||||
|
|
|||||||

Bresha Ruins - 005AF
Boss: Paradox Alpha - Atlas Hand
Upon arrival to this location you will immediately be thrown into a boss battle with a giant hand belonging to the creature Atlas. This battle is similar to Gogmagog in that you'll want to start with Slash & Burn or Twin Shields when he telegraphs a Swipe attack. One immediate difference you'll encounter is that Atlas deals Wound attacks. These attacks reduce your maximum HP. When they hit the attack damage value will be red. You'll notice an empty space on the far right of your HP bar. Potions and healing can only heal up to your reduced HP total. In long battles this can be deadly. Later you'll be able to buy Wound potions from Chocolina (the shop owner) that restore your HP to full and restore your maximum HP to its normal amount. For this battle you don't really need to worry because it will not cause enough damage to take you out.
This battle includes 3 cinematic actions. For the first one you need to push the L analog stick to the right. The second is L-Right, L-Up, Triangle/A. This action will stagger the boss. Switch to Double Trouble to finish the battle. Once you reduce its HP to 0 you will get one final action: rapidly press Triangle/A to fill the circle and finish the fight.
Following the fight you'll be captured. Follow the officer to your cell. Once there talk to the guard, then talk to Noel, and talk to te guard again. The strange girl, Alyssa will get you out. Follow her. When she stops talk to her to get an Academy Communicator and a Map of the area. Next you'll get a brief tutorial on changing your party leader. This can be done out as well as in battle.
Pick your party leader (simply a matter of preference at this point) and its time to explore. In the excavation site you will find two chests to either side of the gate - on the left is a box with the 'Leaving' Gate Seal. On the right is 400 gil. To the right of the map in raised area are a sphere (tucked into a small alcove behind some boxes) containing a Black Belt and a sphere (south of Chocolina) containing 350 gil.
At this point it's time to meet Chocolina. This strange woman with Chocobo wings is your mobile store. She will appear at set locations throughout the game. Her goods expand to include new items each time you meet her. However, the items in her Special section are specific to location. For more details on what Chocolina will carry in each location take a look at our Items & Chocolina section. At this point we recommend picking up the weapon improvements for Serah and Noel. Don't worry about buying items at this point. You can get the ones you need in treasure spheres and as loot drops. You may be tempted to pick up some wound potions but you can probably hold off until before you fight Atlas next. A few enemies in the area deal Wound damage (notably the Pulsework Knight and the Hoplites) but it shouldn't be enough to waste an expensive Wound Potion on.
Once you've picked up the treasure items and shopped at Chocolina its time to move on into the ruins. Your very first battle upon reaching the top of the stairs will be with a Cait Sith and a Zwerg Scandroid. Make sure to always take out Caith Sith first in any fight to avoid having him draw things out by curing himself and allies. After the easy battle you will get monster crystals for both enemies and a primer on everything dealing with Recruitable Monsters. Take the tutorials and the Feral Link tutorial that follows. Now, with Caith Sith equipped in your Medic role and Zwerg Scandroid in your Ravager role set up your prefered paradigms, pick up the treasure sphere with 2 Potions and move on up the next set of stairs.
During the next few battles you will come across the Gremlin and Garchimacera. Both are Ravagers but the Garchimacera is the better option. Unless you strongly prefer the Zwerg Scandroid it is a good idea to switch to the Garchimacera. Also available at this time is the Urdimmu who can fill in your extra Commando role. This can be nice for forming the Cerberus paradigm (3 commandos).
Near the gate in the Ecoes of the Past courtyard area there is a soldier you can talk to. This will initiate a tutorial on the Moogle Hunt ability. You can use this ability to reveal partly visible transparent treasure spheres/boxes and other hidden items. Always keep a sharp eye out as some of these items can be extremely difficult to spy. After obtaining the Wild Artefact you should examine the gate to get an optional conversation and a Live Trigger.
You should also talk to the other individuals in this area to start the Fragment Quests Uno Mystica and Ghast Fragment.
In the tunnels to the west of the Echoes of the Past area you will find the best level up location available up to this point. You will fight tons of Hoplites as well as other various monsters. Most notably you can encounter the Pulsework Knight. This Sentinel is the absolute best monster of this role you will be able to acquire for a very long time. It caps at level 20 but is extremely cheap to max out and it boasts a huge amount of HP for this point in the game. You will undoubtedly get enough Potent Bolts while hunting it to be able to max it immediately. With this monster you can set up the Delta Attack paradigm while allowing you to focus Serah and Noel on more important roles. Do not fight Atlas without this monster in your possession.
Also, during your exploration you'll want to trigger two optional Live Triggers. The first one is at a dead end in the east part of the west tunnels. Make sure to pick up the treasure sphere with 8 Mana Droplets. The other is in the tunnel right before the dead end where you fight the Ghast. It's very close to an out-of-phase sphere with a Star Pendant.
When you reach the entrance of the northwest tunnels Atlas will show himself. Alyssa suggests you check out a device in the nearby tunnels for an opportunity to weaken Atlas before you fight him. At a later point in the game you can complete the "A Giant Mistake" Paradox Ending and defeat Atlas without weakening him but this option is impossible for you right now. Head into the tunnels to find the device.
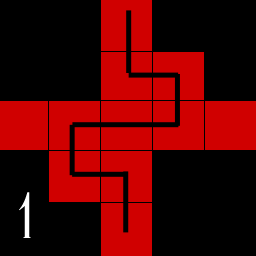
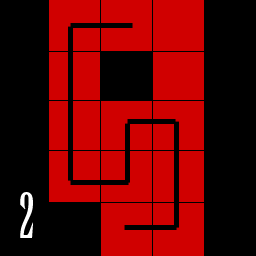
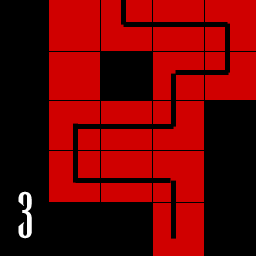
When you find the device (at the end of the right path) examine it to be pulled into your first Temporal Rift puzzle. Here are the solutions:
Once you solve the puzzles examine the device again to weaken Atlas. Return to his location. You might want to stop into Chocolina's before proceeding to pick up a Wound Potion or two. Also, spend any CP you've got in preparation for the fight. Make absolutely sure to set up Delta Attack, Mystic Tower, and Diversity. You'll also probably want Relentless Assault for once you've staggered Atlas.
Boss: Atlas
Depending on how much you've beefed up your party, this battle can go rather quickly with only a bout of Delta Attack, a quick switch to Mystic Tower to to stagger Atlas and then Relentless Assault to finish him off. If you're a little weaker you'll need to have Diversity for healing. Potions can also be a quick solution to health issues. You may, in a tight situation, have to use a Wound Potion depending on how long the battle runs. At the end of the fight you'll get a cinematic action. The commands are: L-Right, Circle/B, L-Right, X/A, L-Right, X/A, L-Right, X/A. After the fight you will receive the Atlas Fragment and 2,500 CP.
After the fight head to Lamentable Rest to the east and examine the column. You'll get some cutscenes and then you'll receive your Live Trigger reward and Chocobos will be available. When you're ready to move on the next location you should head to is the Yaschas Massif 010AF location. However, there is a side trip you may want to take. See the Side Notes section of this page.
Return to FF13-2 Main Page Return to FFExodus Main Page
| Game titles, images and content belong to SquareEnix, we lay no claim to them. Custom content and graphics, however, are © FFExodus team. |