 |
|||||||
|
|
|||||||
Terra
Items: Coronet, Dragon Wrist, Elixir, Remedy, Mythril Racket, Minervas Plate.
After defeating the guardians youll need to fly over the Shimmering Island to start your journey to Terra. Hit the circle button and youll get sucked into Terra.
After the short scene with the old man go down. Youll come to a new screen where youll meet a strange young woman. Youll want to follow her, but there are some items off the path. Take the first left branch. Now hop over to the chest for a Coronet. Then hop along to exit at the top of the screen. Go to the right to find a Dragon Wrist. Then go back to the main path.
Follow the girl to the top of the screen. The chest on the left contains an Elixir. Then try and catch the girl up ahead again. Follow her along the bridge. At the end of the bridge climb down the webbing and then climb down the next set of webbing. The chest here contains a Remedy. Now climb back up to the second level. Go around to the left and hop across the gap. Around the corner is a chest with a Mythril Racket.
Now climb down the webbing on this side. The chest here contains a Demons Vest. Then go around the corner to confront the strange girl. Follow the bridge across.
Go up the stairs here to the platform. On the left side of the platform is a tunnel that spirals down. To the left is a chest with a Minervas Plate. Climb back up and take the stairs up.
Bran Bal
Items: Elixir, Wing Edge.
Make a party of four then go left. Talk to the two people. The one by the pond tells you the inn is to the left. Have Zidane check it out and then hell go back to get Dagger.
After the scene where she wakes up, Zidane will go to explore the town. Head back into the inn to get the chest for an Elixir.
Now head along the back wall, passing up the door to go to the next screen. Enter the door on the far right. Here youll find the storage room. At the back examine the moving pot. Youll release Moorock the moogle. For saving him hell open a mogshop for you. Hell also ask you to deliver a letter to Mozme. You may also encounter Stiltzkin. The chest here contains a Wing Edge.
Go back to the doorway to the right of the inn. In here youll find a group of people around a triangular shape. Talking to them creates interesting conversation. When youre done head down the steps on the right. Down here talk to Mikoto. Follow her back upstairs. This will start a sequence of scenes putting Eiko in control for awhile.
You might want to stock up on supplies and such before continuing. When youre ready head to the entrance and talk to Amarant at the towns entrance. Youll want to go up from here, following where Zidane went. Talk to Mikoto.
Pandemonium
Items: Miter, Carabini Mail, Elixir, Battle Boots.
When you get control of Zidane start walking up. On the next screen youll meet Garland and hell guide you through his palace. Follow him, hopping along the pathway behind him.
After Zidane collapses hell have an emotional breakdown and hell be woken up by Eiko and Vivi. Hell brush them off and get into a battle with an Amdusias.
Amarant and Freya will join in the battle but Zidane rejects them as well. Then hell come across Steiner and Quina and fight with them.
Hell ditch them after the battle and get in a battle with a Shell Dragon that takes his HP down to 1. Dagger comes in to the rescue. Finally Steiner, Quina, and Dagger convince Zidane to rejoin the group. Youll have to run back and grab the others.
Moorock the moogle followed you and will allow you to switch out party members or save. Run back to the first room and examine the chair to get a Holy Miter. Then go back to where Dagger joined you.
In the next room youll have to watch the light sequence. Youll have 30 seconds to cross the bridge. If you touch the lights youll get into a battle.
Once you make it across youll come to a new room with a control device. Examine it and set it to heading 3. Then go to the next room.
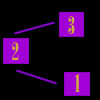
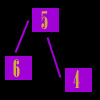
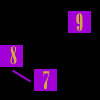
Here youll find a series of elevators that stop at platforms on 3 different levels. The platforms are set up something like this:
 Bottom
 Middle
 Top
TopStart by taking platform 3 up. Youll end up on platform 5.
Now run up and around to the right to get up to the top platforms.
Here take platform 7 to get the chest up here. Then go back down to the bottom level. Go change the heading to 4.
Now take Platform 1 and youll end up on 5. Walk up to the top platforms and use platform 8. Choose to go up to the next floor.
On this level youll want to go up to the right and then down the path to the teleporter. This will take you to a forked path. Take the lower left blue teleporter and go to the end of the path to get a Carabini Mail. Go back up to the fork and use the upper right blue teleporter. Get the chest here for an Elixir.
Now go back to the last room and go to the bottom of the screen. Then go left and take this teleporter. Here take the lower right blue teleporter and then teleport up once more to get a chest with Battle Boots. Go back down.
Lastly take the upper right blue teleporter. Then go up once more. Here youll meet Mozme the moogle. Give Mozme the letter, prepare yourself, and then save your game. Youre about to face three bosses in a row. You can take just about anybody, but Id recommend a party of Zidane, Eiko, Quina, and Vivi.
 Silver Dragon
| HP:24,055 | AP: 13 |
| Vulnerability: None | |
| Steal Items:Kaiser Knuckles, Dragon Mail, Elixir, Ether | Dropped Items: Wing Edge |
If everybody has the Insomniac ability have Quina cast Night. Equip as many status ailment preventions as possible. Use your highest powered summons, either Madeen or Bahamut. Make Zidane steal. Have Vivi use Thundaga.
 Garland
| HP:40,728 | AP: 0 |
| Vulnerability: None | |
| Steal Items:Dark Gear, Ninja Gear, Battle Boots | Dropped Items: N/A |
Make sure everybody has Locomotion equipped. First have Quina cast Mighty Guard and then have Eiko cast Carbuncles Ruby Light. Its a good idea to have Zidane equipped with Bandit and Master Thief. Make Zidane steal. Focus Vivi 3 times and then cast Flare every round to deal 9999 damage each hit.
 Kuja
Kuja
| HP:42,382 | AP: 0 |
| Vulnerability: None | |
| Steal Items:Light Robe, Carabini Mail, Ether | Dropped Items: N/A |
Use similar tactics to the Garland battle. Make sure to use Mighty Guard before summoning Carbuncle. Eiko should summon Madeen when shes not curing or casting reflect on the party. Again, Focus Vivi 3 times to hit Kuja with a high powered Flare.
After the battle with Kuja Zidane decides to save the Genomes in Bran Bal. Run along the path and across the bridge to the teleporter. Run back to Bran Bal and Dagger and Zidane will split up. Zidane will find Mikoto in the basement of the lab and then youll board the Invincible.
Return to topReturn to FF9 Main Page Return to FFExodus Main Page
| Game titles, images and content belong to SquareEnix, we lay no claim to them. Custom content and graphics, however, are © FFExodus team. |
