 |
|||||||
|
|
|||||||
Scene: Chapter 5
Location: Farplane
Dear Diary,
Finally it came time to choose our path down to the Farplane. When we'd decided we spoke to Brother and headed down.
Note: There are five "Road to the Farplane"'s you can take. Once you start down the path you will not reach a save point until you get to the Farplane Glen and there are several boss battles at the end of the road before the Farplane Glen. After you have successfully reached the Glen you can board the Celcius and take another one of the paths. If you take all five routes in the order we've listed them you will receive the Megiddo Garment Grid. To jump to a specific path's walkthrough take the links below. There are also links if you want to jump directly to boss strategy for the Aeon battles or the Celcius scenes.
Bevelle Route | Calm Lands Route
Aeon Battles | Celcius Scenes | To the End
Besaid Temple Path
Upon dropping through the hole at Besaid we found ourself on a simple path. However, we noticed that there were four islands that activated when we stood on them. They took us back a ways up the path. Out of curiosity we rode the islands four times. After doing this we found a chest with a Mega-Potion on the next island. After this we headed down the rest of the path.
Return to top
Kilika Temple Path
When we dropped into the Kilika hole we discovered a path with fiery geysers along it. We found that if we touched too many of the geysers we were teleported back to another location on the path. We decided that the straighforward approach would not work. Instead we waited for the flames to subside before running across them. By doing this we were able to make it down the path without being teleported to an earlier point on the path.
Return to top
Djose Temple Path
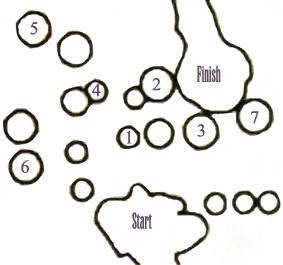
It turns out that by taking the Djose Temple hole we had a very tricky path in store for us. When we followed the most direct route we found ourselves at a dead end. We went back to where the paths diverged and hopped across the islands to a small strip of path to the right. Along this path we found three islands anchored to it. After looking at the first island we were able to change views to see the three islands together. First we pushed the left island toward island 3. Then we pushed the right island toward island 1. Then we pushed the center island toward island 2. This created a path that we followed to the Shiva Boss Battle. After that we followed the path a ways more. We found a small island on the path. We rode the island to a spot between the main path and a side branch. We jumped onto the side branch and went down the path. The first treasure chest we found was empty but the second one contained a Turbo Ether(x2). After that we headed back to the main path and proceeded to the large island.
Return to top
Bevelle Underground Path
After dropping into the Bevelle hole we found a fairly simple path. All we did was hop from path to path until we got to the end of the paths.
Return to top
Cavern of the Stole Fayth Path
The Calm Lands path was rather confusing but we just had to get past the path's attempts to disorient us. The path had a series of teleporters that would move us to different locations on the path. The only way we could get through it was to keep heading down, no matter how many times we were teleported to new locations. Through persistence we made it to the end of the path.
Return to top
The Aeon Battles
I'd really hoped that we were done with fighting my corrupted allies but it was not to be. As we reached the end of the path we were forced to fight Shiva, The Magus Sisters, and Anima.

| Shiva | |
| HP: 14800 | MP: 9999 |
| EXP: 8000 | AP: 15 |
| GIL: 2000 | Pilfer GIL: 5000 |
| STEAL: Snow Ring | DROP: Crystal Gloves, *Regal Crown |
Shiva's pretty simple to defeat if you exploit her elemental weakness - fire. When Shiva attacks she drains HP & MP at the same time. You'll want to have someone ready to restore MP to your magic user(s). Also, it might help you to cast Slow on her, it's one of the only status attacks that work on her. Just be persistent and don't get careless and you'll be fine.

| Mindy | Cindy | Sandy |
| HP: 9788 | HP: 12240 | HP: 10330 |
| MP: 9999 | MP: 9999 | MP: 9999 |
| EXP: 3000 | EXP: 0 | EXP: 3000 |
| AP: 8 | AP: 0 | AP: 8 |
| GIL: 1000 | GIL: 0 | GIL: 1000 |
| Pilfer GIL: 3000 | Pilfer Gil: 0 | Pilfer GIL: 3000 |
| STEAL: Chaos Shock | STEAL: White Cape | STEAL: Potpourri |
| DROP: Faerie Earrings | DROP: Faerie Earrings, *Pixie Dust | DROP: Pixie Dust, *Crystal Gloves |
It is essential to eliminate one of the three sisters immediately. If you don't they will perform an often deadly combined attack called Delta Attack. Mindy is the best target to get rid of first, not only does she have the lowest life of the three but her rapid fire tail attacks can be quite nasty. You'll want to have a healer around to heal the rest of the party. You'll also need to cast Dispel on the sisters because they'll cast a defense spell that reflects all magic attacks and reduces physical attack damage significantly. Once you've taken out Mindy, take out Sandy next, and finally get rid of Cindy to finish this battle.

| Anima | |
| HP: 36000 | MP: 9999 |
| EXP: 6000 | AP: 15 |
| GIL: 2000 | Pilfer GIL: 4000 |
| STEAL: Fury Shock | DROP: Tetra Band |
Anima is the strongest of the aeons, just as she was in Final Fantasy X. You'll want to prep for this battle by equipping accessories that protect against status ailments. Also, you'll need a healer working constantly to keep your HP high. Every few rounds Anima will perform Oblivion, her overdrive. It is just as powerful as it was in X so be prepared for major HP loss. Anima takes half damage from almost all magical attacks. The only magic effective in this battle is Holy. So, use the Warrior's Excalibur and Yuna's Kogoro Holy (Trainer). Another effective attack is the Dark Knight's Darkness attack. Just be cautious and try to take this aeon down as quickly as possible and you should be fine.
Once we'd defeated the aeons we were able to rest in the Farplane Glen. We found Leblanc, Ormi, and Logos waiting for us there. They were eyeing the path forward with dread. No doubt they wanted us to go in first. Leblanc had some items in case we wanted to stock up on anything. We then decided it was in our best interests to head back to the Celcius for a break before tackling the danger ahead.
Return to top
Back on the Celcius
When we got back to the ship I spoke with Shinra. Turns out he learned quite a bit from our trip to the Farplane. Hopefully it will come in handy for the rest of our journey. After that I decided I needed some fresh air so I headed up to the deck. However, Buddy and Brother beat me to the spot. They were having a pretty heated discussion - luckily I'd picked up enough Al Bhed by now to follow it. After that I headed back to the Cabin and walked into the middle of a full blown family spat. Cid just couldn't get over wanting to fill the captain's seat but Brother and Rikku weren't going to put up with it. When things finally calmed down I decided it was time to head back to the Farplane Glen to journey forward.
Return to top
To the End
Back at the Farplane Glen we stepped through the swirling vortex into the Heart of the Farplane. And we were faced with the strangest of puzzles. The entire path was full of magical barriers. And if we attempted to walk through the barriers we were thrown back and then forced to fight a terrifying fiend called the Azi Dahakas. Our best bet at surviving this puzzle was to deactivate the barriers. This was done by inputting musical notes into three different organs. Just to the left of the first organ was a glyph pad that played the notes So Mi* Re*. We went to the organ and put in the notes and the first barrier was dropped.
The second area was much trickier. The three musical pads we needed to step on were all under smaller electrical fields. The trick was to wait for the field to activate, then immediately after it shut down we ran through to the musical pad. The notes we gathered this way were Do* Ti La So. The chest right by the orgain contained a Megalixir. After inputting the second note set the second barrier dropped.
The third set was scattered along several different paths. At one point we had to drop down to a different path to get the notes. This final set was Fa Mi Fa So Do. After inputting this last set we we met up with Gippal. He ran ahead but he left Paine with a sphere from her spherecorder. Then it was time to open the final barrier by solving Shuyin's final puzzle. We had to leap on musical pads in the correct order following the musical sequence from the first three sets. But it wasn't as easy as it sounds. I sketched a map to help us figure it out.
After stepping on the pads we went to the top and stepped on a pad there to make sure we'd inputted the song correctly. With the final barrier released we proceeded forward to fight Vegnagun. The thing was Huge! We decided to break up the parts of the machina among the groups of people we had (Note that Leblanc showed up after all the hard work was done). Unfortunately the other groups didn't fare so well so we ended up taking on all the different parts. We started with the Tail, then the Leg, then the Core, and finally the Head.

| Vegnagun Tail | |
| HP: 34200 | MP: 9999 |
| EXP: 5000 | AP: 5 |
| GIL: 3000 | Pilfer GIL: 3000 |
| STEAL: X-Potion (X4, *X6) | DROP: Megalixir |
The Tail has one of the strongest attacks of the many Vegnagun pieces. The laser it fires will usually do about 1500 points of damage. Keep your healer doing her job and let heavy attackers like the Dark Knight take down this piece.

| Vegnagun Leg | |
| HP: 18220 | MP: 9999 |
| EXP: 6000 | AP: 5 |
| GIL: 3000 | Pilfer GIL: 3000 |
| STEAL: Elixir (*X2) | DROP: Mythril Bangle |
While fighting the Leg portion of Vegnagun you'll also have to contend with three high HP nodes. The battle will end when you destroy the leg but you can get the rare Hero Drink by killing the nodes. The nodes have 30000 HP apiece but they each give you 8000 EXP. The nodes function as follows. When they're green they will cast support magic on the Leg, when they're yellow they'll use magic attacks, and when they're red they'll use physical attacks. You can only take them out using long range attacks and magic but be aware that if a node is yellow it's immune to magic and if it's red it's immune to physical attack. You'll need to use your highest powered black magic like Ultima and Flare. When you're done toying with the nodes go ahead and kill the Leg - it shouldn't pose much of a problem.

| Vegnagun Core | |
| HP: 33040 | MP: 9999 |
| EXP: 7000 | AP: 10 |
| GIL: 3000 | Pilfer GIL: 4000 |
| STEAL: Turbo Ether | DROP: Megalixir |
The Core is protected by two bulwarks to either side. You'll need to take them out before you can damage the Core; also be aware that they cast protective magic on the Core and disabling magic on your party. A single casting of Darkness should get rid of them right at the beginning of the battle. You'll then need to quickly take out the Core before it can perform it's charge up attack. If you do get hit with it heal quickly. You'll have to take out the bulwarks again because the Core will have revived them. You shouldn't have to take the power up attack a second time.

| Vegnagun Head | |
| HP: 38420 | MP: 9999 |
| EXP: 0 | AP: 10 |
| GIL: 0 | Pilfer GIL: 8000 |
| STEAL: Megalixir | DROP: None |
You'll definitely want to have Ribbons on your party for this battle. The head is accompanied by two redoubts to either side. You won't be able to damage the Head until you've gotten rid of both redoubts (again, using Darkness should get rid of them with one hit). Also, the redoubts can do quite a bit of damage to your party when they team up. After the redoubts are down the Head will alternate doing two things - trying to revive the redoubts (one at a time) or cast a multiple status ailment poison on your party. As soon as you get rid of the redoubts hit the Head with everything you've got. Note that there is a time limit on this battle. If Shuyin speaks 7 times before you've killed the Head he will fire Vegnagun and destroy Spira.

After taking out Vegnagun you'll find yourself face to face with Shuyin. He's not extremely difficult but he's no pushover. You should note that almost all of his attacks are mimics of Tidus' overdrives from Final Fantasy X. He will be hitting multiple party members with a single attack and he has at least one attack that can deal almost 4000 damage. Keep a healer working the whole time because letting your HP get too low is fatal. Take him down quickly with your heaviest physical and magic attacks.
About the Endings: If you've been following this walkthrough you should have scraped together enough percentage points to have 100%. However, there are still a few things you'll need do. Note that there are 4 possible endings. The first one happens if you lose the battle against Vegnagun. Then there are three positive endings. Also, the ending scenes are cumulative so if you get the Good Ending you'll see the first two endings; if you get the Perfect Ending you'll see all three scenes. If you've breezed through the game and didn't hear whistling on your first visit to the Farplane Glen then you will receive the Common Ending. To get the good ending you'll need to do something after you've beat Shuyin. You'll be standing in the Farplane Glen and you'll need to press the X button. Bahamut's fayth will appear and ask Yuna if she wants to see a certain person. Answer "Yes" and you'll be able to view the Good Ending after the credits roll. The Perfect Ending is awarded when you've done everything to activate the Good Ending AND you've achieved 100% completion.
Return to top
Return to X-2 Main Page Return to FFExodus Main Page
| Game titles, images and content belong to SquareEnix, we lay no claim to them. Custom content and graphics, however, are © FFExodus team. |