 |
|||||||
|
|
|||||||

Hidden Espers
Final Fantasy XII contains 13 Espers. Five are found through story and eight of them are optional. For information on how to use these Espers please check out our Espers Section in the main content of our site. Here you will find where and how to get the eight optional Espers of the game.
Cuchulainn, the Impure
Zalera, the Death Seraph
Zeromus, the Condemner
Exodus, the Judge-Sal
Chaos, Walker of the Wheel
Ultima, the High Seraph
Zodiark, Keeper of Precepts
Adrammelech, the Wroth
When Available: After receiving Dawn Shard
How to Acquire: Adrammelech is in the Zertinian Caverns. Take the Ozmone Plain entrance and go to the Athroza Quicksands, a large, crossroad type room in the southern Zertinian Caverns. Note the map will be scrambled in this room.
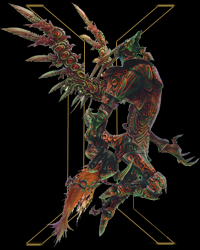
Adrammelech
| Level: 39 | LP:42 |
| HP: 39,630 | MP: 999 |
| Vulnerable: B | Absorb: T |
| Immune: F,E,W,A,H,D | |
| Drop: N/A | Steal: Pebble, Capricorn Gem, High Arcana |
Adrammelech himself isn't that tough a customer but this room spawns high level shambling corpses that make this a particularly nasty battle. Both the corpses and the Esper are weak to Blizzard so pound them with it, preferably with an area attack. Note that Adrammelech is a flying boss so be prepared with ranged weapons for those not using magick. It's a good idea to keep at least one party member focused on dealing damage to the Esper and use the others, when not healing, to keep the corpses in check. If you have an Foe: lowest HP or something like that it will be helpful for this strategy. If you're coming into this battle earlier on in the game you're definitely going to want to use your quickenings and concurrences - it's likely the only way you'll survive. After your first team uses their charges rotate one character at a time from the other team in to maximize your quickening usage.
Return to Top
Cuchulainn, the Impure
When Available: After Dawn Shard
How to Acquire: Cuchulainn is in the Garamsythe Waterway. First you must defeat the "Waterway Haunting" and "Lost in the Pudding" hunts to get the Sluice Gate Key. With that done go to Central Waterway Control and manipulate the controls to open the path. Follow these steps:
Step 1: Close controls No.3 and No.10 in Central Control.
Step 2: Enter No.3 Cloaca Spur and activate the No.1 South Waterway Control at the end of the path.
Step 3: Back at Central Control open No.3 and No.10. Then close No.4 and No.11.
Step 4: Now enter No.4 Cloaca Spur and activate the No.1 North Waterway Control at the end of the path.
Step 5: Back at Central Control open No.11 and close No.3.
Step 6: Save your game in Central Control and then enter the No.1 Cloaca. The Esper is in a large squarish room at the southern end.
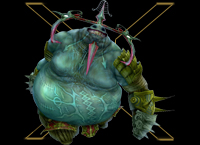
Cuchulainn
| Level: 45 | LP:50 |
| HP: 126,165 | MP: 999 |
| Vulnerable: N/A | Immune/Absorb: N/A |
| 1/2 Damage: All | |
| Drop: N/A | Steal: Elixir, Scorpio Gem, High Arcana |
Come prepared with Black Belts on the party to prevent disable. Stock up on Remedies and eat them like candy as necessary. For this battle you'll want your strongest and best armored fighter and your two best healers. Curaja helps immensely but the Esper can be obtained without it. It's also a good idea to use the gambit Ally: HP Critical with X-Potions. Be aware that there is a constant Sap effect during this battle that cannot be prevented in any way. Towards the beginning the Esper will summon a wave of Foobars - eliminate them as quickly as possible with a Concurrence or Firaga. Immediately restore any lost MP to your healers. After that the battle consisits of persistent attacking while staying alive. Beware of the Esper's Invert attack that reduces a character's HP to the same number as their MP temporarily. Revive any fallen party members as quickly as possible. With enough time and effort the fat Esper will fall.
Return to TopZalera, the Death Seraph
When Available: After Dawn Shard
How to Acquire: First you need to complete the Desert Patient sidequest to get the Barhiem Key. Then find the secret entrance in the Estersand. Make your way through the Passage until you find Terminus No.7. Beware of the seriously powerful undead creatures that inhabit this path. At the southern end of the Zeviah Span there is a path that seems blocked. Look on the west side for something to push over to make a path down to West Annex. In West Annex the undead appear in greater numbers and groups. Keep along this path and be eased with knowledge that there is a save point before Zalera (Terminus No.7 Adjunct).
Zalera
| Level: 40 | LP:42 |
| HP: 72,240 | MP: 999 |
| Vulnerable: N/A | Immune/Absorb: All |
| 1/2 Damage: N/A | |
| Drop: N/A | Steal: Pebble, Gemini Gem, High Arcana |
You only have five minutes to defeat Zalera - literally. At the end of the timer you'll be ejected from battle and you'll have to start over. Also, any time there is a Dead Bones on the field Zalera is immune to physical damage (including Quickenings). Have a gambit set to attack lowest max HP. It's also good to have at least one party member immune to disable. Be aware that Zalera's initial attacks target you based on level. Zalera casts Lv.2 Sleep, Lv.3 Disable, Lv.4 Break, Lv.5 Reverse, and Prime Lv. Death.
Knowing that this is going to be a nasty battle, let's continue. Start the battle by dispeling Zalera. Then kill the minions and smack the Esper with Quickenings until another Dead Bones is summoned. Keep this up until the Esper falls. To keep the Quickenings coming rotate in one of your other party members one at a time. If nobody has MP left start passing out Ethers. Keep in mind that when Zalera's life gets low it stops bothering with level and just smacks you with Sleepga, Stop, and Death.
Return to TopZeromus, the Condemner
When Available: After defeating Judge Bergan
How to Acquire: Go to Mt. Bur-Omisace and talk to the Acolyte at the foot of the stairs going into the Hall of the Light. He'll tell you about a "greater power" in the Stillshrine of Miriam. You'll also get the Stone of the Condemner to open the path. Go back to the Stillshrine and activate the Way Stone at the south end of Ward of Measure. You'll be asked if you want to use the Stone of the Condemner. Say yes and you'll end up at the Throne of the Veiled Gods. Go through the double doors here to fight Zeromus.
Zeromus
| Level: 51 | LP:55 |
| HP: 166,888 | MP: 999 |
| Vulnerable: N/A | Immune/Absorb: N/A |
| 1/2 Damage: All | |
| Drop: N/A | Steal: Elixir, Cancer Gem, High Arcana |
This battle's quirk is an anti-magic field. Before going into battle you absolutely must have a large stock of Chronos Tears to fix Stop. You may want someone with an accessory that prevents Stop. Equip Pheasant Netsukes on everyone else. Instead of using Hi-Potions or X-Potions rely on the accessory and Phoenix Downs. With Pheasant Netsukes and the Phoenix Lore augment your Phoenix Downs should restore a fallen party member close to full life. Be aware that Zeromus enters battle with Reflect, Protect, and Shell - you cannot dispel these effects. Also, avoid using Motes because the spells will be reflected back at you.
Zeromus is also accompanied by Dark Lords. Have a Foe: lowest HP - Attack gambit set up. You'll want a party of your hardest hitters since magic is not an issue. If the Dark Lords start to overwhelm you throw out a Quickening and Concurrence to even the field. Freely use Quickenings because you don't need to reserve MP for anything and you build it back up quickly while attacking. If you get a chain of Dark Lords going they should start dropping bonuses that might help you out. When there aren't any Dark Lords on the field focus your attacks on Zeromus. Alternate attacking with Quickening and Zeromus should fall with a little effort.
Return to TopExodus, the Judge-Sal
When Available: After repairing the Silikawood Gate
How to Acquire: In the Mosphoran Highwaste go to the Babbling Vale. First speak with the Learned Man and then speak with the Caravaner south of the shop. With that done go to the Shrine of the South Wind and touch it to raise some floatweed. Now to northeast to Rays of Ashen Light and snag the wayward Chocobo. Take it south to Empyrean Way and use the new floatweed path to the right of the entrance. Proceed to the end of the path and take the grassy chocobo path into Skyreach Ridge. You'll go towards the west ridge of Babbling Vale until you find the Shrine of the West Wind. After touching that Shrine knock over the Weathered Rock to get back into the Babbling Vale main area. Now touch the Shrine of the Northwest Wind next to the Learned Man. Make your way using the new paths to the isolated location in the middle of the highwaste. The goal is to climb to the top of the hills. When you step onto that isolated platform you'll come face to face with Exodus.
Exodus| Level: 46 | LP:52 |
| HP: 119,060 | MP: 999 |
| Vulnerable: N/A | Absorb/Immune: N/A |
| 1/2 Damage: All | |
| Drop: N/A | Steal: Libra Gem, Elixir, High Arcana |
Exodus starts the battle with Reflect and a defensive spell combo on him. Dispel this immediately. Be aware that he will recast Reflect throughtout the battle so the best tactic here is to avoid offensive magic. Also, Items are locked in this battle. Exodus uses two nasty spells - Flare and Scathe. If they're ripping you apart get Shell up on your party members. Focus on physical attacks and technicks like 1,000 Needles. You can also employ Expose to reduce the Esper's resistance to physical damage. Towards the end of the battle Exodus will raise a Paling to prevent physical damage. You can either wait this out or use Opal Rings or Dispel to hit the Esper with Dark attacks (the strongest variation you have at the time). You might also choose to hit the boss with some Quickenings. When the Paling falls finish the Esper off with a barrage of physical attacks.
Return to TopChaos, Walker of the Wheel
Coming Soon
Return to TopUltima, the High Seraph
Coming Soon
Return to TopZodiark, Keeper of Precepts
Coming Soon
Return to TopReturn to FF12 Main Page Return to FFExodus Main Page
|
Armor/Accessories Bazaar Bestiary Characters Espers Gambits Items/Sundries Loot Magicks/Technicks Marks Quickenings Sidequests Walkthrough Weapons |
|||
|
|
|||
|
|
Image Gallery Wallpapers |
||
| Game titles, images and content belong to SquareEnix, we lay no claim to them. Custom content and graphics, however, are © FFExodus team. |